Installing a Virtual Machine (VM) on Linux is relatively easy. In this guide, I’ll show how to install a Windows 11 VM on Linux using VMware Player 17.
The Linux host I’m using is my favorite Linux, ‘Pop!_OS’. The laptop is an ASUS Q504UA from 2016, and its CPU is unsupported in Windows 11. PCs older than 2018 are not compatible with Windows 11. For example, the official list of supported CPUs prefers 8th-gen Intel or 2nd-gen AMD or newer.
Install VMware Player on Linux
The Pop!_OS is an Ubuntu-based Linux OS. So, follow along for an easy installation of VMware. To learn more about Pop!_OS, you may visit their official website.
First, Download VMware Player 17 at this link.
Second, open the Terminal app and run the command:


How to Create a Windows 11 Virtual Machine
Generally, creating a Windows 11 VM is accessible. This VM is the sandboxed Guest. For instance, it’s a separate machine from the host.
Next, the wizard will guide you to browse the downloaded CD raw image or ISO file. In addition, allocate 64 GB minimum storage for the VM:

Most steps are self-explanatory. Meanwhile, continue with a few more.
For this example, choose Windows 11 Pro.

Temporarily disconnect your PC’s Internet. For instance, shut off WiFi or disconnect your Ethernet cable. You can bypass creating a Microsoft Account and install a Local Account instead.

To continue, you need to press “Shift+F10” for the Command Prompt. Next, type “OOBE\BYPASSNRO” to bypass network requirements.
Hence, the VM reboots, and Setup continues, but it will give you the option for “I don’t have internet.”

Then, resume with a “limited setup” and create a Local User.


If you want better privacy, you can disable many privacy settings. But changing them prevents Microsoft from tracking everything you do online.
So, you’ll want to toggle them off for improved privacy. The following steps show the initial privacy settings during Setup:


Installing the VMware tools allows you to change your VM sizes as needed. It will scale its size if desired by dragging or changing to Full-Screen mode.


However, there are many more settings to change to improve privacy. But that’s for another blog post.
Fix VMware Error “This PC can’t run Windows 11.”
Indeed, VMware notes the following steps to fix the error:
- While installing Windows 11, if your computer does not meet the hardware requirements, you’ll see a message stating, “This PC can’t run Windows 11.” Windows 11 setup blocked due to missing hardware requirements.
- When you see the above message, press Shift+F10 (Or Shift+fn+F10) on your keyboard simultaneously to launch a command prompt. At the command prompt, type regedit and enter to launch the Windows Registry Editor.
- When the Registry Editor opens, navigate to HKEY_LOCAL_MACHINE\SYSTEM\Setup, Right-click on the Setup key, and select New > Key.
- When prompted to name the key, type LabConfig and press enter.
- Now right-click on the LabConfig key, select New > DWORD (32-bit) value, create a value named BypassTPMCheck, and set its data to 1.
- Configure the BypassTPMCheck key under the LabConfig key, close the Registry Editor, and then type exit in the Command Prompt followed by enter to close the window. You will be back at the message stating that the PC can’t run Windows 11. Press the back button in Windows setup.
- You will now be back at the screen prompting you to select the version of Windows 11 you wish to install.
- You can now continue with the Setup and bypass the hardware requirements.
Reference: https://kb.vmware.com/s/article/86207
How to Bypass Microsoft CPU or TPM Checks
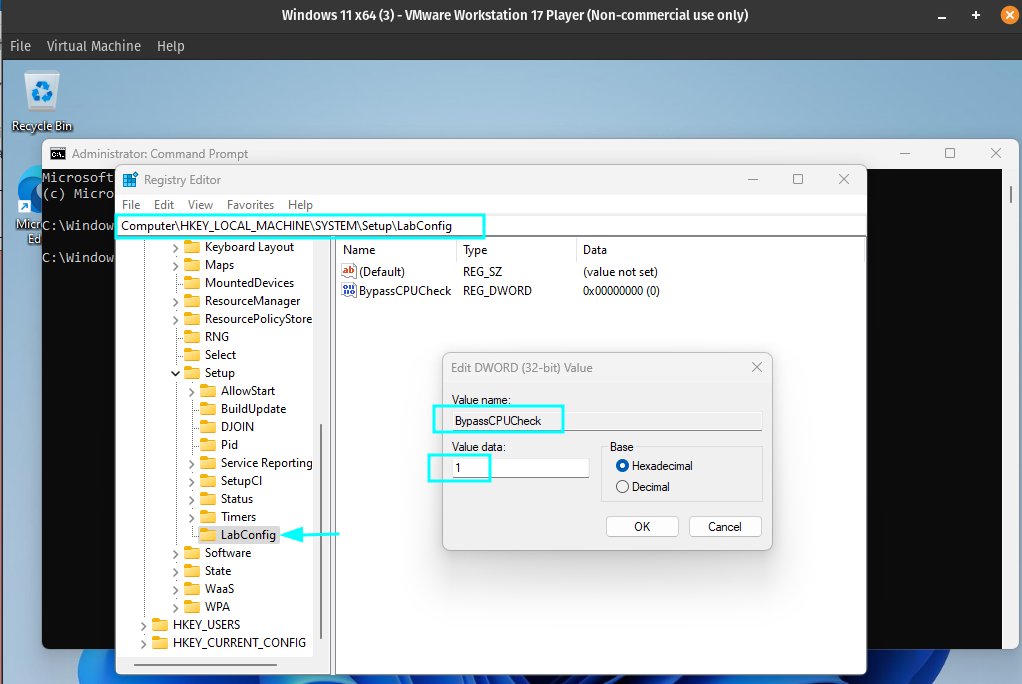
It’s an easy issue to solve if your PC has an unsupported CPU or TPM 1.2 instead of TPM 2.0. But the following steps show how to tweak the Registry and bypass the Windows 11 checks:
- To get started, open the Registry Editor. Press Shift+F10 to launch the Command Prompt. Type “regedit” and enter.
- Next, navigate to HKEY_LOCAL_MACHINE\SYSTEM\Setup, Right-click on the Setup key, and select New > Key.
- To create the LabConfig key, right-click on the right window pane and type in the name.
- Within LabConfig, create DWORDs values called BypassCPUCheck and BypassTPMCheck and set each to 1.
- To create a new DWORD value, right-click in the right window and select new > DWORD (32-bit) Value, then name the key, double-click to open it, and set it to 1.

In short, after closing the Registry Editor, you can continue with Windows 11 Setup. So, you bypassed hardware checks, and you can test Windows 11 now.


